
��
User Manual (full version)
��
Also see the quick installation guide here. (last update : 22 Dec, 06)
��
Installation steps basics
Please do the following steps in this order:
1. Mount the LED stands.
2. Connect the cables and the gun.
3. Install driver (for PC only, skip this step for PS2™ or Xbox™).
4. Finish hardware calibration and then you could play the game.
Details of each step are as follows.
Mounting the LED stands
Procedures
1. In theory, the LED stands can be mounted at any arbitrary location in relation to the screen, as long as the gun can see all 5 sets of LEDs when you point at all corners of your screen.
2. The LED stands have keyhole mounts for mounting with screws, and clips to hang from the top of your screen. You may use BLU-TACK (not included in the package) to fix the stands beside the screen. Please see the BLU-TACK official site: http://www.bostik.co.za/stationery/blutack.htm
3. Mount the stand with three LED sets on the left, the one with two LED sets on the right. Please refer to figure 1.
4. If your display is too large (diagonal larger then 60 inches), or you can't stand far enough back, you may need to mount the stands inside the actual screen. Please refer to figure 2.
5. Make sure the LEDs are facing forward exactly, such that the camera at the gun could see the LEDs.
6. You only need one pair of LED stands for a dual-gun setup.
7. All 5 sets of infrared LEDs are not visible for human eye, while the red LED would indicate if power is ON.
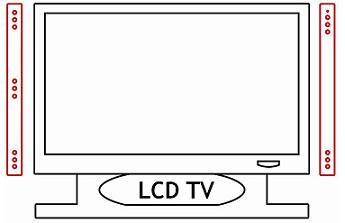
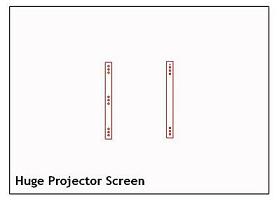
Figure 1 Figure 2
Important notes for TopGun Blaze Stand (Product No. 0607)
For screens of size smaller then or equal to 80 inches, TopGun Blaze Stand should be mounted beside the screen.
For screens of size larger then 80 inches, TopGun Blaze Stand should be mounted in the middle of the screen.
Note: TopGun Blaze Stand (No.0607) is an accessory of EMS TopGun. It is a pair of ultra bright LED stands
specially designed to support huge screen of 60 inch or above. It is not included in the TopGun package.
TopGun Blaze Stand office site :
http://www.hkems.com/product/xbox/TopGunBlazeStand.htm
��
Connect the cables and the gun
TopGun Cable
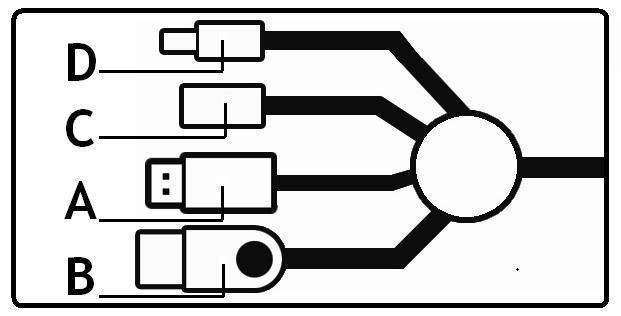
There are 4 plugs from the cable of the gun:
A) USB (for PS2™ or PC)
B) Xbox™
C) Power (female, for recoil function)
D) Power supply (male, for LED stands or recoil function)
��
��
Single Gun Setup
1. Set the switch at the bottom of the gun correctly, P for PS2™ or PC, X for Xbox™.
2. Connect (C) and (D) together. (Ignore this if you don��t need the recoil function)
3. For PC or PS2™, connect (A) to the USB port. For Xbox™, connect (B) to the Xbox™ joypad port.
4. Connect the LED stand power cable to the "mini Y shape cable" provided and then to the console (Xbox™ �C joypad port / PS2™ or PC �C USB port). The console would provide power for the LED stand. If the cable is not long enough, you could use an AC - DC Transformer (not included in the package) instead. See the AC - DC Transformer output requirements below.
Dual Gun Setup
1. Set the switch at the bottom of the gun correctly, P for PS2™ or PC, X for Xbox™.
2. Connect (C) and (D) together. (Ignore this if you don��t need the recoil function)
3. For PC or PS2™, connect (A) to the USB port. For Xbox™, connect (B) to the Xbox™ joypad port.
4. For Xbox™ / PC, connect the LED stand power cable to the "mini Y shape cable" provided and then to the console (Xbox™ �C joypad port / PC �C USB port). The console would provide power for the LED stand. If the cable is not long enough, you could use an AC - DC Transformer (not included in the package) instead. See the AC - DC Transformer output requirements below.
5. For PS2™, please use an AC - DC Transformer (not included in the package) to provide power for the LED Stands.
See the AC - DC Transformer output requirements below.
Note:
1. For dual gun setup of PS2™, in case you don��t want to buy an extra AC-DC transformer, you could connect the LED stand power cable to plug (D) of a gun in step 3. In this way, the recoil function of that gun would be sacrificed.
2. For the 1st time you connect the TopGun to PC, the PC should ask you for driver. See Install the driver. If it doesn��t ask you for driver but find an unknown USB device instead, please try another USB port or use a USB hubs.
AC - DC Transformer output requirements
![]()
For the Gun (recoil function) : 600mA or above, 5V
For the LED stands : 600mA or above, 5V
��
Install the driver
Important
1. This step is only for PC. Skip this if you are using PS2™ or Xbox™.
2. In case you have installed any other 3rd party TopGun driver, you must un-install them first.
3. For the 1st time you connect the TopGun to PC, the PC should ask you for driver. If it doesn��t ask you for driver but find an unknown USB device instead, please try another USB port or use a USB hubs.
Procedures
1. Download the Gun2Mouse V3.2 (zip version) from the link below:
http://www.hkems.com/files/EMS%20TopGun%20V3.2.zip
2. Un-zip it to any location you like.
3. Set the switch at the bottom of the gun to "P", and connect the gun to PC.
4. The computer will ask you for driver, please direct it to the location in step 2.
5. Test the gun if it is workable in PC. See Test.
6. Calibrate the gun, see Hardware Calibration.
7. Run "Gun2Mouse V3.2.exe", set up the macro as you like, and click "Start". Then you could use the gun to control the mouse pointer and play games.
��
Test
1. Right click "my computer", select "property", select "device manager��. Inside the "device manager", you could find the "EMS TopGun V3.2". If there is an interjection mark beside it, please right click it and update driver, and direct it to the location of where you unzip the file in step 2.
2. Run the Tester.exe, click button test and see if it response.
3. In the Tester.exe, click Fire test and see if it response.
Hardware calibration
Important
1. The gun only works as long as it can see all 5 sets of LEDs when you point at all corners of your screen. Therefore, the distance between the gun and the screen should be around 2-3 times of the distance between the two stands.
2. For PC, you cannot enter calibration mode nor do hardware calibration if the driver is not installed /broken.
3. For PS2™ and Xbox™, please run the game first before doing the hardware calibration.
4. Make sure the switch at the bottom of the gun is correctly set to either P (PC/PS2™) or X (Xbox™).
Procedures
1. Turn ON the laser pointer switch.
2. Make sure the pointer lights when you aim at all corners of the screen. If the laser pointer flashes, that means there is some interruption source (refer to Warning) beside / behind where you are aiming at. If the laser pointer doesn��t light, that means the gun cannot see all 5 sets of LEDs. If so, the gun may be too close to the screen.
3.
Point the gun off-screen (i.e. aim at floor/ceiling). Hold down A + B button
for 5 seconds to enter calibration mode.
(You
could see the laser lights)
��
4. Shoot the following targets in this order:
For stands mounted beside the screen : For stands mounted in the middle :
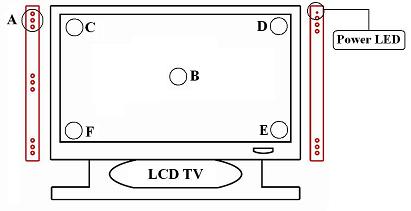
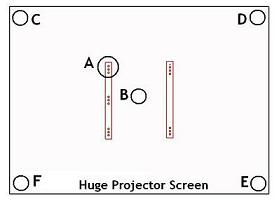
I) Shoot the Top left LED set. (i.e. point A of the above picture)
If it success, the laser pointer will flash and the gun will recoil for once. If it doesn't repeat until it does.
II) Shoot the Center of the screen. (i.e. point B of the above picture)
If it success, the laser pointer will flash and the gun will recoil for once. If it doesn't repeat until it does.
III) Shoot the Top left corner of your screen. (i.e. point C of the above picture)
If it success, the laser pointer will flash and the gun will recoil for once. If it doesn't repeat until it does.
IV) Shoot the Top right corner of your screen. (i.e. point D of the above picture)
If it success, the laser pointer will flash and the gun will recoil for once. If it doesn't repeat until it does.
V) Shoot the Bottom right corner of your screen. (i.e. point E of the above picture)
If it success, the laser pointer will flash and the gun will recoil for once. If it doesn't repeat until it does.
VI) Shoot the Bottom left corner of your screen. (i.e. point F of the above picture)
If it success, the laser pointer will flash and the gun will recoil for once. If it doesn't repeat until it does.
VII) After success in (VI) it would quit the calibration mode automatically, and you could use the gun now.
��
Note
1. When the gun is not in calibration mode, the laser pointer should only light when the gun can see all the LEDs. In calibration mode, the laser would light no matter where you are aiming at.
2. If the power cable for recoil function is well connected, the gun will recoil for once when the pointer flashes, so as to indicate the success of each sub-procedure in step 4.
3. You could hold START + SELECT button to quite the calibration mode if there is anything wrong.
4. If the actual game screen is larger then the TV could display, in step 4, you may shoot a little outside the TV screen to compensate this effect, or the accuracy may be affected slightly.
5. If the gun enters calibration mode automatically without holding A + B and you could not quit the calibration mode by pressing START + SELECT, please jump to step 4. After calibration, the gun would return normal.
Warning:
1. Any infrared sources (Sun light or yellow light or any heat source) may interrupt the EMS TopGun System, and the pointer will keep flashing to indicate that. Please make sure that no infrared sources are beside or behind the screen.
2. The reflect image of the infrared LEDs may interrupt the EMS TopGun System, and the pointer will keep flashing to indicate that. To solve this problem, a cloth could be placed on those smooth surfaces to prevent reflection.
3. The pointer is harmful for eyes, don��t aim at anyone else.
Designated trademarks and brands are the property of their respective owners. EMS TopGun is fully designed
and developed in-house by EMS Production Ltd. Our website: www.hkems.com Contact: sales@hkems.com